[Download code for the project: GitHub]
In this post we will see how to load and render a 3D model using the Open Asset Import Library (aka Assimp). We will
- Focus on loading a OBJ model, probably the simplest format for 3D models.
- Briefly cover texturing in OpenGLES.
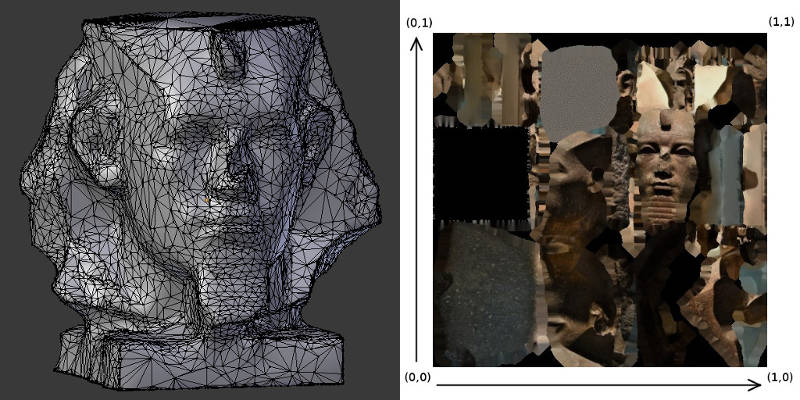
The output of the project on a Nexus 5 is shown below. The 3D model is Granite head of Amenemhat III by The British Museum and is available here. We have reduced the model’s polygon count to reduce size of the .OBJ file.
In previous tutorials, we have seen how to create a GLES context in Java, load shaders in native C++ code, and move a 3D models with touch gestures. This project is very similar to the previous project that demonstrated how to convert touch gestures to a MVP matrix to manipulate a 3D object’s (colored cube’s) position in the scene. The only change in this project is that we use Assimp to load a 3D model described in the OBJ format.
As mentioned before, our approach is largely based on native C++ code in Android and there are a few pre-requisites to understand the project. Kindly go through previous tutorials to have a better understanding of this post.
Contents
Get the code
This project is available on GitHub. You can find more instructions to compile the project here.
The project requires devices with ABI armeabi-v7a. If your device supports a different ABI, then please get in touch with me for the required libraries.
Code overview
We focus on files that are new in this project when compared to the previous tutorial (all paths are relative to <project_path>/app/src/main):
- java/com.anandmuralidhar.assimpandroid/AssimpActivity.java: It contains the only activity of the project and is same as CubeActivity.java except for the change in name. It’s JNI calls are implemented in assimpActivity.cpp.
- externals/assimp-3.0: This contains the headers for Assimp 3.0. It also contains prebuilt shared library for Android ABI armeabi-v7a. If your device is of a different ABI type, then please contact me for the prebuilt shared library.
- nativeCode/common/assimpLoader.cpp: It has implementation of the
AssimpLoaderclass that contains methods to read a 3D model using Assimp’s C++ API. - nativeCode/modelAssimp/modelAssimp.cpp: It contains the
ModelAssimpclass which calls methods ofAssimpLoaderto load and render a 3D model. - assets/shaders/modelTextured.vsh and modelTextured.fsh: Shaders for rendering a textured 3D model.
- assets/amenemhat/amenemhat.obj, amenemhat.obj, and amenemhat.jpg: The .obj and .mtl files define the model’s geometry and material properties. amenemhat.jpg contains the texture that is mapped to the model’s surface.
3D models in GLES
Let us briefly look at various aspects of loading and rendering 3D models in GLES.
Texturing in GLES
In previous projects, we viewed a 3D model in GLES as comprised of a set of triangles. In order to add color to the object, we chose a color for each vertex. Now we may want to create a 3D model that resembles real-world objects. Towards this, we want to map an image to the surface of an object. As an example, compare 3D model of a bust below with the image next to it.
We map portions of the image to individual triangles in the 3D model to create the model as shown in the above video. This process is called texturing and is a vast subject in 3D modeling. We will restrict our attention to basics of texturing.
A triangle from the 3D model gets mapped to a triangular portion of the image as shown in the zoomed figure below.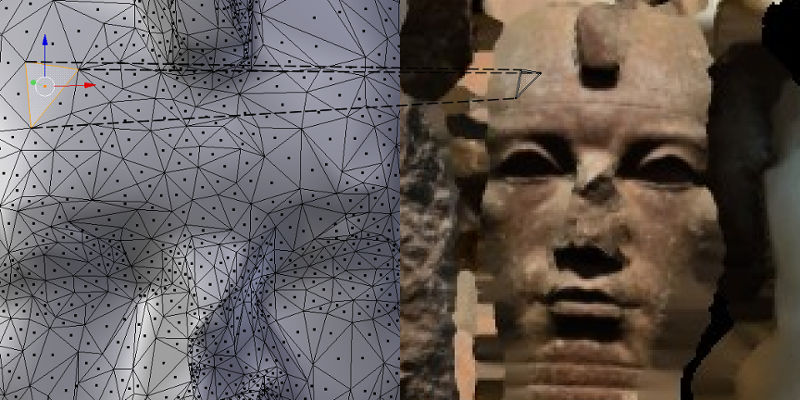 In order to specify this mapping, each vertex of a triangle in the 3D model is mapped to a vertex of the corresponding triangle in the image. Since the image is a 2D array, the coordinates of the triangle on the image are specified as a 2-tuple (u, v) with both u and v ranging from 0 to 1 as shown here. This (u,v) tuple is referred to as texture coordinates or UV coordinates of a vertex. Note that the shape of the triangle in the 3D model can be different from the shape in the image. The triangle from the image is appropriately “stretched” before being applied to the surface of the model. This mapping from vertices of a 3D model to points on a image is referred to as texture mapping. A pixel from the texture image that is mapped to the surface of the 3D model is called a “texel”.
There are many topics in textures that deserve a detailed look at a later stage. Some of these include filtering, mipmaps, and rendering to textures.
Note 1: Our discussion seems to indicate that textures in GLES are equivalent to images. This is not true. Textures can represent any data that is stored in an array. In fact it is possible to render directly to a texture if we want to store results of GPU’s computations in an output array.
Note 2: 3D models are not always created by manually mapping triangles in the model to triangles in the texture image. There are various sophisticated softwares that can take pictures of a real-world object and automatically generate a 3D model along with the image and the texture mapping. The model used in this project was constructed like that from scans or pictures of an existing object.
OBJ format
The OBJ format is a very simple format that only supports 3D geometry of the model, i.e., we cannot specify animation using this format. It contains the vertex positions, texture coordinates, vertex normals, and faces of an object. OBJ simplifies representing an object by storing the vertices separately and storing a list of tuples corresponding to vertex indices that make a face (triangle or other polygon) of the 3D model. This removes inefficiencies we saw in the previous project with replicating vertices for the colored cube. The OBJ format contains vertices of the 3D model arranged into collections referred to as meshes in 3D modeling.
An OBJ file has a companion .MTL file that contains information on the material properties of various meshes in the model. In this project we only consider OBJ’s that have a texture assigned to every mesh. We ignore other material properties like ambient color, specular color, etc.
Loading 3D models with Assimp
Open Asset Import Library or Assimp is an excellent library to import various formats of 3D models. It has a simple one-line command to load the model into its internal data structure. We can parse Assimp’s internal data structure and collect the model’s vertices, texture coordinates, faces into arrays that can be loaded to GLES. The internal data structure of Assimp remains unchanged irrespective of the format of the 3D model that we choose. So even though we have chosen a OBJ file in this project, following discussion on assimpLoader.cpp is equally applicable to any other format.
Note: Assimp has a AndroidJNI module that helps to load objects in native code in Android using asset-management if you are using the NativeActivity class. We have seen earlier that using NativeActivity is not a good idea and we avoid using this module in Assimp to load models. Since we have written native functions to read Android’s assets, this module is not of much use to us.
Use Assimp’s API to load and render a OBJ
We will look at the file assimpLoader.cpp that implements methods of the
AssimpLoader class. Though this file is long, individual functions are fairly simple. In fact we already know most of it except steps concerning Assimp’s API and texture mappings. We will only look at those steps that are not familiar to us from previous tutorials.
In the class’s constructor, we create an instance of Assimp::Importer and assign it to a pointer. Assimp::Importer is Assimp’s C++ API for reading 3D formats. In the constructor of AssimpLoader, we also perform initialization related to GLES shaders that are familiar to us by now. We find locations of vertexUVAttribute and textureSamplerLocation in the constructor and will look at the significance of these variables soon.
Next look at the function Load3DModel that is responsible for loading a 3D model into GLES’ memory. It has a one-line call to load the model into Assimp’s data structures!
scene = importerPtr->ReadFile(modelFilename, aiProcessPreset_TargetRealtime_Quality);
scene is a pointer to an object of type aiScene, which is the main structure used in Assimp for the imported data. scene will persist as long as importerPtr persist’s in the app’s memory and it is owned and managed internally by Assimp.
After importing the model with Assimp, we call two functions; LoadTexturesToGL and GenerateGLBuffers. As their names suggest, LoadTexturesToGL will parse the model’s materials to check for textures and load those textures into GLES’ memory. GenerateGLBuffers generates buffers to hold vertex positions, vertex texture coordinates, and face indices.
In LoadTexturesToGL, we begin with clearing a std::map object, textureNameMap, that holds the texture filename and texture name in GLES. Texture names in GLES are actually integers that index various textures loaded into GLES’ memory. Sometimes, they are also referred to as texture indices.
Then we parse the imported scene to check for list of textures. We store the texture’s filename in textureNameMap and initialize texture name in GLES to 0.
for (unsigned int m = 0; m < scene->mNumMaterials; ++m) {

    int textureIndex = 0;
    aiString textureFilename;
    aiReturn isTexturePresent = scene->mMaterials[m]->GetTexture(aiTextureType_DIFFUSE,
                                                                 textureIndex,
                                                                 &textureFilename);
    while (isTexturePresent == AI_SUCCESS) {<code>
        //fill map with textures, GLES name set to 0
        textureNameMap.insert(std::pair<std::string, GLuint>(textureFilename.data, 0));

        // more textures? more than one texture could be associated with a material
        textureIndex++;
        isTexturePresent = scene->mMaterials[m]->GetTexture(aiTextureType_DIFFUSE,
                                                            textureIndex, &textureFilename);
    }
}
Assimp reads texture filenames for meshes from the .MTL file and stores it in scene, but all that complexity is hidden from us. Then we provision space for the required number of textures in GLES by generating names for them:
GLuint * textureGLNames = new GLuint[numTextures];
glGenTextures(numTextures, textureGLNames);
This effectively fills up textureGLNames with an array of integers corresponding to the texture names. Since we need absolute paths of the textures to read the image, we extract the path from the .OBJ filename into modelDirectoryName:
std::string modelDirectoryName = GetDirectoryName(modelFilename);
Next we iterate over the texture names stored in textureNameMap and read a texture using OpenCV:
cv::Mat textureImage = cv::imread(textureFullPath);
This loads the texture image into a OpenCV matrix. It may seem like overkill to include OpenCV in the project for just reading an image, but I really love this library and we will use a lot of it in future tutorials.
OpenCV reads a image in the BGR format and we convert it to RGB for GLES. We also need to flip it since the image origin is at different positions for GLES and OpenCV:
// opencv reads textures in BGR format, change to RGB for GL
cv::cvtColor(textureImage, textureImage, CV_BGR2RGB);
// opencv reads image from top-left, while GL expects it from bottom-left
// vertically flip the image
cv::flip(textureImage, textureImage, 0);
To load the texture image into GLES, first bind the texture name with glBindTexture to indicate that it's a 2-dimensional texture:
glBindTexture(GL_TEXTURE_2D, textureGLNames[i]);
Then choose linear filtering:
glTexParameteri(GL_TEXTURE_2D, GL_TEXTURE_MAG_FILTER, GL_LINEAR);
glTexParameteri(GL_TEXTURE_2D, GL_TEXTURE_MIN_FILTER, GL_LINEAR);
We did not discuss various filtering options in GLES, but it suffices to know that linear filtering is generally preferred for texture images. It smoothens the rendered 3D model image by averaging neighboring pixel colors while choosing a color for the displayed pixel.
Finally we load the OpenCV matrix into GLES with glTexImage2D by specifying its dimensions and format:
glTexImage2D(GL_TEXTURE_2D, 0, GL_RGB, textureImage.cols,
             textureImage.rows, 0, GL_RGB, GL_UNSIGNED_BYTE,
             textureImage.data);
Next let's look at GenerateGLBuffers. In this function, we populate a struct MeshInfo that saves all the information required to render a mesh:
struct MeshInfo {
    GLuint  textureIndex;
    int     numberOfFaces;
    GLuint  faceBuffer;
    GLuint  vertexBuffer;
    GLuint  textureCoordBuffer;
};
We have already generated textureIndex for each texture in LoadTexturesToGL. From previous tutorials, we know how to generate and load buffers like faceBuffer, vertexBuffer, textureCoordBuffer. We use glGenBuffers, glBindBuffer, and glBufferData to generate, bind and load data into the buffer respectively. We only need to see how to extract the relevant data from Assimp.
First we read a mesh into a local variable:
const aiMesh *mesh = scene->mMeshes[n]; // read the n-th mesh
Indices for all faces are not available as a single array and need to be parsed and added to faceArray before loading them into GLES
for (unsigned int t = 0; t < mesh->mNumFaces; ++t) {

    // read a face from assimp's mesh and copy it into faceArray
    const aiFace *face = &mesh->mFaces[t];
    memcpy(&faceArray[faceIndex], face->mIndices, 3 * sizeof(unsigned int));
    faceIndex += 3;

}
Face indices have to be treated a little differently than the buffers that we have seen earlier.
glGenBuffers(1, &buffer);
glBindBuffer(GL_ELEMENT_ARRAY_BUFFER, buffer);
glBufferData(GL_ELEMENT_ARRAY_BUFFER,
             sizeof(unsigned int) * mesh->mNumFaces * 3, faceArray,
             GL_STATIC_DRAW);
We indicate the buffer's type as GL_ELEMENT_ARRAY_BUFFER since these are indices to the list of vertex positions. For example, if a particular face's indices are (23, 42, 546) then this face is created by vertices at indices 23, 42, and 546 in the list of vertex positions.
Vertex positions are available in mesh->mVertices and it is fairly straightforward to load them into GLES.
For vertex texture coordinates, we load the UV coordinates of all vertices to textureCoords.
float * textureCoords = new float[2 * mesh->mNumVertices];
for (unsigned int k = 0; k < mesh->mNumVertices; ++k) {
    textureCoords[k * 2] = mesh->mTextureCoords[0][k].x;
    textureCoords[k * 2 + 1] = mesh->mTextureCoords[0][k].y;
}
Then it is straightforward to generate a buffer for texture coordinates and load it into GLES.
We save the texture name in GLES for this mesh. Remember that texture names in GLES were saved in textureNameMap in LoadTexturesToGL. The same texture can be used by multiple meshes and the same texture name is populated in the MeshInfo struct for all those meshes.
aiMaterial *mtl = scene->mMaterials[mesh->mMaterialIndex];
aiString texturePath;	//contains filename of texture
if (AI_SUCCESS == mtl->GetTexture(aiTextureType_DIFFUSE, 0, &texturePath)) {
    unsigned int textureId = textureNameMap[texturePath.data];
    newMeshInfo.textureIndex = textureId;
} else {
    newMeshInfo.textureIndex = 0;
}
Finally let's look at the shaders and Render3DModel together to understand how to render the 3D model. The vertex shader modelTextured.vsh is as follows:
attribute   vec3 vertexPosition;
attribute   vec2 vertexUV;
varying     vec2 textureCoords;
uniform     mat4 mvpMat;

void main()
{
    gl_Position     = mvpMat * vec4(vertexPosition, 1.0);
    textureCoords   = vertexUV;
}
The only difference between this shader and cubeMVP.vsh is that instead of passing the vertex color, we pass the vertex texture coordinates in vertexUV to the fragment shader. The fragment shader modelTextured.fsh is equally simple but more interesting:
precision mediump float; // required in GLSL ES 1.00

varying vec2      textureCoords;
uniform sampler2D textureSampler;

void main()
{
    gl_FragColor.xyz = texture2D( textureSampler, textureCoords ).xyz;
}
We introduced a new variable type sampler2D and a new function texture2D. The sampler2D variable tells the shader which texture to use for sampling. We set the value of textureSampler from Render3DModel:
glActiveTexture(GL_TEXTURE0);
glUniform1i(textureSamplerLocation, 0);
So we activate texture unit 0 with the function glActiveTexture and pass this information to the shader. In order to attach a texture to texture unit 0, we need to bind the texture in Render3DModel:
if (modelMeshes[n].textureIndex) {
    glBindTexture( GL_TEXTURE_2D, modelMeshes[n].textureIndex);
}
glBindTexture will bind the texture to the currently active texture unit. Now the fragment shader can sample from this texture by using the texture coordinates as indices. This is accomplished using the texture2D function. Note that since textureCoords is passed from the vertex shader, it is interpolated across vertices and the texture is sampled at all fragments inside every triangle of the 3D model.
Rest of Render3DModel is similar to the rendering functions that we have seen previously, except for the command used to bind faces:
glBindBuffer(GL_ELEMENT_ARRAY_BUFFER, modelMeshes[n].faceBuffer);
Since faces are loaded to an index buffer, this needs to be indicated to GLES so that the indices in the faces array can be used to read the corresponding vertex positions that form each triangle of the model.
Extract files of 3D model
Let us look at the file modelAssimp.cpp that implementes the
ModelAssimp class. This class is derived from MyCube class in the previous post. In fact it is much simpler than MyCube since all the complexity towards handling 3D models is in the AssimpLoader class. In PerformGLInits, we create an instance of AssimpLoader
modelObject = new AssimpLoader();
Then we extract the OBJ file, MTL file and the JPEG from Android's assets folder so that AssimpLoader can import them into Assimp's data structure:
std::string objFilename, mtlFilename, texFilename;
bool isFilesPresent  =
        gHelperObject->ExtractAssetReturnFilename("amenemhat/amenemhat.obj", objFilename) &&
        gHelperObject->ExtractAssetReturnFilename("amenemhat/amenemhat.mtl", mtlFilename) &&
        gHelperObject->ExtractAssetReturnFilename("amenemhat/amenemhat.jpg", texFilename);
We use gHelperObject->ExtractAssetReturnFilename to extract files like shaders in Android's assets folder and we had discussed it in a previous post.
Now the extracted OBJ file can be passed to modelObject:
modelObject->Load3DModel(objFilename);
We do not need to explicitly pass names of the MTL and JPEG files to modelObject since Assimp reads the OBJ file and extracts names of the MTL file from it. The JPEG filename is then extracted from the MTL file.
ModelAssimp::Render is fairly simple since it gets the current MVP matrix and passes it to the Render3DModel method of modelObject.
Linking against prebuilt libraries
In this project, we are linking against two prebuilt shared libraries; Assimp and OpenCV. We have modified <project_path>/app/build.gradle to include these prebuilt libraries while linking the code.
model {

    repositories {
        libs(PrebuiltLibraries) {

            // Assimp prebuilt shared lib
            my_assimp {
                // Inform Android Studio where header file dir for this lib
                headers.srcDir "src/main/externals/assimp-3.0/include"
                // Inform Android Studio where lib is -- each ABI should have a lib file
                binaries.withType(SharedLibraryBinary) {
                    sharedLibraryFile = file("src/main/externals/assimp-3.0/libs/" +
                            "${targetPlatform.getName()}/libassimp.so")
                }
            }

            // OpenCV prebuilt shared lib
            my_cv {
                // Inform Android Studio where header file dir for this lib
                headers.srcDir "src/main/externals/opencv-3.0.0/include"
                // Inform Android Studio where lib is -- each ABI should have a lib file
                binaries.withType(SharedLibraryBinary) {
                    sharedLibraryFile = file("src/main/externals/opencv-3.0.0/libs/" +
                            "${targetPlatform.getName()}/libopencv_java3.so")
                }
            }

        }
    }
    ...
}
We need to also specify the paths to the libraries in jniLibs:
jniLibs{
    source {
        srcDir "src/main/externals/assimp-3.0/lib"
        srcDir "src/main/externals/opencv-3.0.0/libs"
    }
}
We have copied OpenCV's shared library and its headers from the OpenCV Android SDK while Assimp's shared library was compiled by us for the ABI armeabi-v7a. We have included the script that we used for compiling Assimp; <project_path>/app/src/main/externals/assimp-3.0/buildForAndroid.sh. This project will not execute on devices that require a different ABI. Please contact me if you need libraries for other ABIs.
Hi,
I am getting this error in android studio 2.2.1
Error:Shared library link file E:\Yuvaraj\3dmodelndk\AssimpAndroid-master\app\src\main\externals\assimp-3.0\libs\armeabi-v7a\libassimp.so does not exist for prebuilt shared library ‘my_assimp:armeabi-v7aDebugShared’.
Hi Yuvaraj,
That’s a strange error because the file is included as part of the repo. Can you check if the file is there at the specified location?
Are you working on a Windows machine? Then you can try modifying the paths in build.gradle. For example, replace
headers.srcDir "src/main/externals/assimp-3.0/include"withheaders.srcDir "src\main\externals\assimp-3.0\include"and so on for all the paths and let me know if that helps..so file is not there in the path. Is .so file will be generated automatically or we have to generate. If we have to generate then can you guide me to generate .so file. Thanks
You are right, the file is actually missing in the repo! I have modified .gitignore and added the file now. It was previously ignoring the file.
Please let me know if you are able to build the code now.
Yes now its working Thanks. How to generate .so file do you know any links or tutorial or books pdf
I picked up OpenCV’s .so from its package.
Assimp’s .so was generated using the script buildForAndroid.sh as mentioned towards the end of the blog. I had adapted this script from other blogs but do not have their links with me.
Yesterday i learn t how to create .so file for my sample project for two methods. Here i am trying to build two .so file for two library at a time but it creates only one at a time for example: “MyLibrary” is created not “native-lib”.
build.gradle:
ndk {
moduleName = [“native-lib”,”MyLibrary”]
}
sourceSets.main {
jni.srcDirs = []
jniLibs.srcDir “src/main/libs”
}
Android.mk
LOCAL_PATH := $(call my-dir)
include $(CLEAR_VARS)
LOCAL_MODULE := native-lib
LOCAL_MODULE := MyLibrary
LOCAL_SRC_FILES := native-lib.cpp
LOCAL_SRC_FILES := MyLibrary.cpp
include $(BUILD_SHARED_LIBRARY)
Application.mk
APP_MODULES := native-lib
APP_MODULES := MyLibrary
APP_ABI := all
is this can be done or is there any other way to do this. Thanks
As far as I know you can create only one .so with a single .mk. You can post such questions regarding Android in forums/blogs that deal with it.
Assuming I use a .dae file, I already replace the .obj by my dot .dae and it shows up well in the application, the problem is that the texture appears all black
Hi Victor,
Apologies for the delayed reply, I was traveling for last 10 days.
I’ve not used Collada files and am not familiar with the format. Are the textures bundled with the file? If the textures are contained in a separate file, then you need to load the texture into the assets folder and specify its path for extraction in
ModelAssimp::PerformGLInits.If the textures are bundled in the same file then you will need to modify
AssimpLoader::LoadTexturesToGLto appropriately load them. I would also suggest looking at the variablesisTexturePresentandtextureFilename.datain the above function to confirm that the textures are present and available in the desired location.Hi Anand, another good tutorial, Thank You. I have two questions:
1) I gues the project without any touches should work only on ARM based devices. But I tried it on Intel Atom tablet and it works without any changes (ABI – armeabi-v7a). I gues I should use ABI for x86 (or x86_64) on Intel Atom, but why it is working with armeabi?
2) Could you recomend some free (or not expensive) and good model design/editor tool and/or texture editor? (for Windows)
Thank You
Hi Petr,
Thanks for your comments.
1) Ideally the project should not run on x86 devices, though I’m not sure if the device has internal support to translate armeabi instructions to x86. But you should not count on this for any app that you plan to release in the app store.
2) Blender is my favourite free software for working with any aspects of 3D modeling. It has a sharp learning curve and is a little confusing to use in the beginning, but is worth learning if you plan to work with 3D models/textures. Here’s an excellent set of tutorials on Blender: http://gryllus.net/Blender/3D.html
Thank You Anand. This is exactly what I am looking for :).
It is really a nice and helpful piece of information. I’m satisfied that you just shared this
helpful information with us. Please stay us up to date like this.
Thanks for sharing.
Thanks for your comment, glad you found it to be useful! 🙂
Hi,Thanks for your post first. then, how to modify this demo and then use it to load 3d model from web server ?
Hi azheng,
Apologies for the late reply.
It should be fairly straightforward to load from the webserver once you download the 3D model and its textures to the mobile device. Then you can use the path to the downloaded model in
ModelAssimp::PerformGLInitsin order to load it with a call toLoad3DModel.HI ! Its a amazing and wonderful tutorial but I want to ask something. I am wiling to click on this 3d model and then create an alert Dialog or Toast. Can you tell me How is it possible ? I am be very thankful to you …. please reply as soon as possible..
Hi Saqib,
You will need to calculate a bounding box around the 3D model and determine any clicks whose coordinates lie in this box. Then it should be possible to create an Toast from that.
How to put required 3d model made using blender. It does not have the .jpg file.
Hi Amruthan,
This post deals specifically with OBJs that have an associated texture. If you have a model that does not have a texture, then you can comment portion of the code that loads the texture (jpgs), though you will also need to modify the fragment shader that reads from a texture. If you want your model to be visible as in Blender, then you will need to implement a simple lighting setup in the fragment shader.
How to animate .dae or .fbx file using assimp in anroid
Hi Nishant,
It is possible to animate using assimp, but that would be a little more involved that just loading the model. You will need to load the bone data and load the animation steps according to a timer. This tutorial should help you to get started with a basic animation using assimp. Note that you will need to compare it with the code in the project in order to port it to Android.
This is my error :
Error:Execution failed for task ‘:app:transformNativeLibsWithMergeJniLibsForDebug’.
> More than one file was found with OS independent path ‘lib/armeabi-v7a/libassimp.so’
Please help me
Hi Quang,
I’m not able to make sense of this error. It looks like it is finding multiple copies of libassimp.so. Can you clone a fresh copy of the project and try again. Also please ensure that your device is armeabi-v7a.
Sorry about not being of much help here.
Hi
Thanks for the blog .
Acutlly i want to load fuse multiple fbx file into 1 single fbx . Can it be possible with Assimp lib??
Please reply thank you in advance
Hi Kiran,
Assimp is used for rendering models and not necessarily for fusing them. But you might be able to load the models in a sequence using Assimp that makes it appear like you have fused them one-after-another. This will require substantial code changes to manage the various models though. Hope this helps.
I am trying below GLTF model to get render in Android. But All my meshes got rendered in center position. I want to render all my meshes as per required output. Details for meshes position is available in GLTF file.
GLTF Model –
https://agreeyamobilitynet-my.sharepoint.com/:f:/g/personal/nishant_dande_mobiliya_com/EsVN65xpv8dAlH1K6ft9d7QBYHbATXnRF812Tagc7-vXlg?e=Rh1v5E
Please help me as soon as possible.
Hi Nishant,
I’m not familiar with GLTF and cannot help you much with this. However if you understand the code in this project, then you might be able to use Assimp for rendering GLTF models.
Hi! When I run this project, it reminds me that “couldn’t find ‘libModelAssimpNative.so'” How can I solve it???
You need to compile and build the project for the lib to be generated. Then you can run it on a compatible device.
Hi
Thanks for the amazing tutorial .
I want to run this project in a x86 device but i can’t because assimp and opencv library is only available for arm-v7 . would you please share all .so format that make this project to run in all available devices?
Thank’s for your help.
Hi, thanks for your comments!
You can find libs for x86 here: https://github.com/anandmuralidhar24/libsForx86Android
I like this article, because so much useful stuff on here : D.
Hi Anand,
Thank you for the series of tutorials. It makes the understanding of android studio and OpenGL so easy!
I’m trying to execute the same app on armeabi-v8, can you please provide some pointers as to how to get the libraries(opencv 3.0 and assimp lib)?
Thank you.
Hi Sowmya,/app/src/main/externals/assimp-3.0/buildForAndroid.sh.
Thanks for your comments! I have built the libs for x86 and thats available here: https://github.com/anandmuralidhar24/libsForx86Android
Unfortunately I dont have the libs for armeabi-v8. You can try to build it using the script available here, though I’m not sure if assimp has support for that architecture:
In case of OpenCV, you will need to look OpenCV Android SDK to see if you can find it.
It has been a while since I worked at this project so I’m unable to help you with more specific details.
Hi, Ananda.
Thank you for your tutorial. I want to change the 3D model, such as repairing its nose. Is there any way or suggestion?
Thank you very much.
Hi Jason,
You can certainly change the OBJ file in the repo and make the code changes to point to the new object. That will replace the existing 3D model with your chosen model.
Hi, Anand。
Thanks for your sharing! I got an error in output.txt “usr/android-ndk-r16b-linux-x86_64/android-ndk-r16b/sources/android/native_app_glue/jni.h:39:19: fatal error: stdio.h: No such file or directory”. I don’t know if it is caused by the change of the sdk version. Do you have any ideas about this problem?
Thank you very much.
Hi Frank,
Sorry but I’m not aware of this specific problem. It could be due to the change in the SDK version as you mentioned.
Hope you are able to find a fix for it.
Hello! When I use this project to multiple load stl file to show 3D model, it throw this error:
A/AssimpAndroid: [FAIL GL] AssimpLoader::renderObject()
E/AssimpAndroid: GL_OUT_OF_MEMORY: not enough memory left to execute command
I think it is out of memory ,how to solve this question?
Maybe the size of your STL file is too large for the device that you are using. You can try to run the project with the files that I’ve provided and replace it with a file of similar size.
Thanks for the blog .
I want to load ifc file . Can it be possible with Assimp lib?How to do?
Please reply thank you in advance
Hi, I’m not actively supporting this project. You can replace assimp with the latest versions and check if it works.