[Download code for the project: GitHub]
In this post, we will show how to:
- Use vertex buffer objects (VBOs) to define a triangle’s vertex positions and colors, and update the VBO every frame to animate the triangle.
- Write a GLSL ES shader to display the triangle.
- Extract the shader files from the applications’s assets using native methods.
Here’s the output on a Nexus 5:
In a previous post, we outlined our approach based on native C++ code in Android and mentioned pre-requisites to understand the project. Kindly go through the previous article to have a better understanding of this post.
Get the code
This project is available on GitHub. Refer to this link for more details on how to import the project.
Code overview
MyGLRenderer and MyGLSurfaceView are copied as-is from the previous project. There is only one Java activity in the project; TriangleActivity.
We have added new directories and files to <project_path>/app/src/main/jni. The directory jni/nativeCode contains code that we will share with an iOS project in the future.
- <project_path>/app/src/main/jni/jniCalls: It contains two files triangleActivity.cpp and myGLRenderer.cpp with definitions for JNI calls from
TriangleActivityandMyGLRenderer. They are similar to corresponding files in the previous post with an exception that JNI call forCreateObjectNativein triangleActivity.cpp passes two extra parameters; an instance of theAssetManagerand path to the app’s internal storage directory. We will later see how these parameters are used inMyJNIHelper. - <project_path>/app/src/main/jni/nativeCode/common: This is a collection of files that will continue to be used in subsequent projects.
- myGLFunctions.cpp: It has two functions familiar to us from the previous post for performing GLES initialization and for checking for errors in GLES calls.
- misc.cpp: It contains just one function
GetFileNamefor extracting the filename given the full path of a file. In future projects, we will add functions with miscellaneous objectives to this file. - myJNIHelper.cpp: It is an important new addition and contains a class
MyJNIHelperthat helps to extract files from the app’s assets. - myLogger.h: Same as in the previous post except for the change in
LOG_TAG. - myShader.cpp: It has a set of functions that read, compile, and link GLSL ES shaders.
- <project_path>/app/src/main/jni/nativeCode/triangle: This directory has the
Triangleclass and its methods defined in triangle.cpp. - <project_path>/app/src/main/assets/shaders/: It contains two files corresponding to the GLSL ES fragment and vertex shaders; colorTriangle.fsh and colorTriangle.vsh.
Vertex buffer objects and a colorful triangle in GLES
All points on a GLES surface get mapped to 2-dimensional screen coordinates with each coordinate ranging from -1 to +1. As shown in this figure, the mapping is valid even for rectangular screens. We want to draw a triangle on the screen as shown below (in a device in portrait orientation):
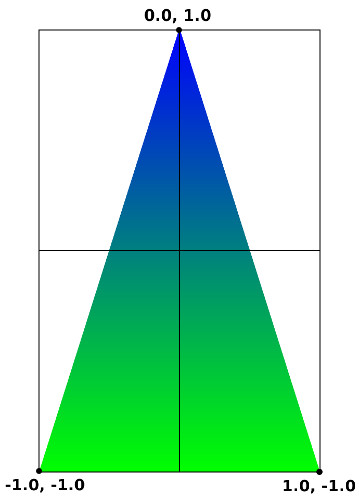
We have added guidelines in above figure to indicate the GLES surface and marked the triangle’s vertices at (-1.0,-1.0), (1.0,-1.0), and (0.0, 1.0). In the function PerformGLInits in triangle.cpp, we define an array containing the three vertices:
static const GLfloat vertexBufferData[] = {
        -1.0f, -1.0f, 0.0f,
        1.0f, -1.0f, 0.0f,
        0.0f,  1.0f, 0.0f
};
We have add a 3rd coordinate equal to 0.0 for all vertices. This is the depth of the vertex and is not relevant for a triangle.
Next we create a vertex buffer object (VBO) to store the vertices. A VBO is an efficient technique to store and access vertices in GLES.
// Generate a vertex buffer and load the vertices into it
glGenBuffers(1, &vertexBuffer);
glBindBuffer(GL_ARRAY_BUFFER, vertexBuffer);
glBufferData(GL_ARRAY_BUFFER, sizeof(vertexBufferData), vertexBufferData, GL_DYNAMIC_DRAW);
Once we generate a buffer with glGenBuffers, we bind it to GL_ARRAY_BUFFER in glBindBuffer to indicate the type of buffer. Then we load the data to the vertex buffer in glBufferData. The last parameter of glBufferData is a usage hint. In most cases, we pass the hint GL_STATIC_DRAW since the data will not be modified again. But since we will regularly update the vertices to animate the triangle, we pass GL_DYNAMIC_DRAW as the usage hint.
Similarly we create another VBO for vertex colors:
//specify colors of the 3 vertices
static const GLfloat colorBufferData[] = {
        0.0f, 1.0f, 0.0f, //green
        0.0f, 1.0f, 0.0f, //green
        0.0f, 0.0f, 1.0f  //blue
};

// Generate a vertex buffer and load the colors into it
glGenBuffers(1, &colorBuffer);
glBindBuffer(GL_ARRAY_BUFFER, colorBuffer);
glBufferData(GL_ARRAY_BUFFER, sizeof(colorBufferData), colorBufferData, GL_STATIC_DRAW);
Before creating the GLSL ES shaders, let us see how to update the data stored in a VBO.
Update data in VBO
In the function AnimateTriangle, we generate new vertex coordinates for every frame by moving the two lower vertices of the triangle.
triangleVertexDelta += triangleSwapRate;
// need to remain in limits of GLES surface coordinates from -1 to +1
if(triangleVertexDelta > 2.0 || triangleVertexDelta < 0.0) {
    triangleSwapRate = -triangleSwapRate;
}
GLfloat vertexBufferData[] = {
        -1.0f+triangleVertexDelta, -1.0f, 0.0f,
        1.0f-triangleVertexDelta, -1.0f, 0.0f
};
Then we bind the VBO for the vertices and load the new data into it.
glBindBuffer(GL_ARRAY_BUFFER, vertexBuffer);
glBufferSubData(GL_ARRAY_BUFFER, 0, sizeof(vertexBufferData), vertexBufferData);
glBufferSubData is used to only update a portion of vertexBuffer corresponding to the first two vertices.
Use GLSL ES shaders to render the triangle
OpenGL ES Shading Language
Shaders are small programs that execute in the GPU of a device and are used to perform various rendering operations. These are written in a language called OpenGL ES Shading Language (GLSL ES) that is similar to C++. These shaders are written in pairs corresponding to a vertex shader and a fragment shader. Briefly, the vertex shader executes on every vertex that is passed to the shading program while the fragment shader executes on every pixel. In case you are wondering about the difference between a vertex and a pixel, then look at the image of the triangle. The triangle has only three vertices, but it occupies many pixels (also referred to as fragments) on the device display. The vertex shader executes only on the three vertices of the triangle, while the fragment shader executes on all fragments inside the triangle. In an example involving a more complex 3D model (rather than a single triangle), multiple fragments can potentially determine the output at a pixel.
Unlike rest of the code in an Android application, GLSL ES shaders are compiled at run time in a device. Both vertex and fragment shaders are separately compiled and linked to create a shader program. We can create multiple shader programs by linking different pairs of shaders.
In this project we create one shader program by linking colorTriangle.vsh (vertex shader) and colorTriangle.fsh (fragment shader). We follow a convention of naming vertex shaders with the extension .vsh and fragment shaders with .fsh. These shader files are plain text and you are free to choose any name or extension for them.
We adopt OpenGL ES 2 for most of the projects since support for OpenGL ES 3+ is not widespread across Android devices. GLES 2 requires us to use GLSL ES version 1.00, an older version of the language. Since GLSL ES 1 suffices for most rendering tasks in the shader, there are few reasons to build an app that restricts itself to devices that support OpenGL ES 3+.
Vertex and fragment shaders
Let us start with the vertex shader; colorTriangle.vsh:
attribute   vec3 vertexPosition;
attribute   vec3 vertexColor;
varying     vec3 fragmentColor;     // this is 'sent' to the fragment shader

void main()
{
    gl_Position.xyz = vertexPosition;
    gl_Position.w   = 1.0;
    fragmentColor   = vertexColor;
}
This is a fairly simple shader though the variable types may seem odd if you are seeing a shader for the first time. The attribute qualifier indicates input variables to the shader that are fed on a per-vertex basis. In this project, it is used for vertex positions and vertex colors. These variables are read-only and can change for every vertex. We indicate the data type as vec3 for a vector containing 3 floating point values. The 3 values can be accessed as vertexPosition.x, vertexPosition.y or vertexPosition.z.
The varying qualifier indicates a variable that is sent to the fragment shader. In this example, we copy the vertex color and send it to the fragment shader.
The variable gl_Position is of type vec4 (vector with 4 floating point values) and is available only in the vertex shader. It should always be populated with a value since it contains the final homogeneous position of the vertex.
The fragment shader is equally simple:
precision mediump float; // needs to be specified for GLSL 100

varying vec3 fragmentColor; // this is interpolated across vertices

void main()
{
	gl_FragColor.xyz = fragmentColor;
}
gl_FragColor is a special vec4 variable that is available only in the fragment shader. It corresponds to the output color of the fragment. We set it equal to fragmentColor passed from the vertex shader. We need to explicitly specify the precision for a float in the fragment shader in GLSL 1.00 else some GPU compilers will throw an error. This precision qualifier also applies to the vec3 variable that consists of 3 floating point values.
An interesting question arises in our example; we passed colors only for the three vertices in the vertex shader. But fragment shader is executed for all pixels inside the triangle. What is the value stored in fragmentColor for points inside the triangle? The answer is obtained through interpolation in the GLES ES pipeline. Any variable defined with the varying qualifier (like fragmentColor) is interpolated across vertices to compute its value for a fragment. This is the reason you can see the triangle's color transitioning from blue to green as we move across the vertices.
Note: If you are familiar with GL or GLSL ES shaders, then you will notice that we do not specify the #version directive in the beginning of every shader:
#version <number>
If we skip the #version directive, then the GLSL ES compiler will default to version 1.00.
Loading the shaders in Android
We load the shaders and create a shading program by calling LoadShaders in Triangle:PerformGLInits.
std::string vertexShader    = "colorTriangle.vsh";
std::string fragmentShader  = "colorTriangle.fsh";

// compile the vertex and fragment shaders, and link them together
shaderProgramID = LoadShaders(vertexShader, fragmentShader);
LoadShaders is implemented in myShader.cpp and calls GLES functions to compile shaders and link them together to create a program. We will not go through those functions here since understanding them in detail is not critical to begin using GLES. However we note that LoadShaders calls the function ReadShaderCode in myShader.cpp to read the shader code from app's assets. ReadShaderCode uses the MyJNIHelper class as described below. If we do not use the MyJNIHelper class, we would have to read the shaders in Java and create the shading program in Java or pass the shaders as text to native code for further processing.
After creating the shader program, we get the attribute locations of variables in the shader:
vertexAttribute = GetAttributeLocation(shaderProgramID, "vertexPosition");
colorAttribute  = GetAttributeLocation(shaderProgramID, "vertexColor");
GetAttributeLocation is defined in myShader.cpp and calls the GLES function glGetAttribLocation to fetch the location of the attribute variable passed as an argument to it. These attribute locations are used in the rendering call below.
In the function RenderTriangle, we first choose the shader that we want to use:
glUseProgram(shaderProgramID);
Then we enable the VBOs for vertex positions and colors. In glVertexAttribPointer, we pass the corresponding attribute location so that the vertex buffer's data is sent to the appropriate attribute variable in the vertex shader.
// enable the vertex buffer
glEnableVertexAttribArray(vertexAttribute);
glBindBuffer(GL_ARRAY_BUFFER, vertexBuffer);
glVertexAttribPointer( vertexAttribute, 3, GL_FLOAT, GL_FALSE, 0, (void*)0 );

// enable the color buffer
glEnableVertexAttribArray(colorAttribute);
glBindBuffer(GL_ARRAY_BUFFER, colorBuffer);
glVertexAttribPointer( colorAttribute, 3, GL_FLOAT, GL_FALSE, 0, (void*)0 );
At last, we render our colorful triangle with glDrawArrays!
glDrawArrays(GL_TRIANGLES, 0, 3);
glDisableVertexAttribArray(vertexAttribute);
glDisableVertexAttribArray(colorAttribute);
Read file from assets using AssetManager in native code
This topic deserves a section since it is a critical requirement for handling files in native code and there is not much documentation on the web on it. We will use the native support in Android NDK for reading assets. This approach can be used to extract any file from assets including images, binary files, etc. We will use it in this project to extract GLSL shaders and in subsequent projects to extract 3D models and textures.
We begin by obtaining an instance of the AssetManager in Java and the path to internal storage in onCreate of TriangleActivity:
AssetManager assetManager = getAssets();
String pathToInternalDir = getFilesDir().getAbsolutePath();
assetManager is declared as a private variable so that it is not garbage collected during the lifetime of the activity else the native instance derived from it will not remain valid. The internal storage path is always available on an Android device and does not need any permissions.
These two variables are passed to the native code through JNI call for CreateObjectNative (in triangleActivity.cpp) and used to instantiate an object of type MyJNIHelper.
gHelperObject = new MyJNIHelper(env, instance, assetManager, pathToInternalDir);
The constructor of MyJNIHelper in myJNIHelper.cpp uses AAssetManager_fromJava to obtain a native instance of the AssetManager and stores it in apkAssetManager:
MyJNIHelper::MyJNIHelper(JNIEnv *env, jobject obj, jobject assetManager, jstring pathToInternalDir) {

    // get a native instance of the asset manager
    // assetManager is passed from Java and should not be garbage collected!
    apkAssetManager = AAssetManager_fromJava(env, assetManager);

    //Save app internal data storage path -- we will extract assets and save here
    const char *cPathToInternalDir;
    cPathToInternalDir = env->GetStringUTFChars(pathToInternalDir, NULL ) ;
    apkInternalPath = std::string(cPathToInternalDir);
    env->ReleaseStringUTFChars(pathToInternalDir, cPathToInternalDir);

    //mutex for thread safety
    pthread_mutex_init(&threadMutex, NULL );
}
We use standard JNI functions to store the path to internal storage as a std::string in apkInternalPath. Since the AssetManager calls are not thread safe, we initialize a mutex to synchronize across multiple threads that might calls functions that access apkAssetManager. The mutex is not required in this project, but will be useful in the future.
We have defined a function ExtractAssetReturnFilename in myJNIHelper.cpp that takes an asset name as argument, extracts the asset, and saves the extracted file in the internal storage area. The function first checks if the required file has been extracted and is already available in internal storage:
// construct the filename in internal storage by concatenating with path to internal storage
filename = apkInternalPath + "/" + getFileName(assetName);

// check if the file was previously extracted and is available in app's internal dir
FILE* file = fopen(filename.c_str(), "rb");
if (file && checkIfFileIsAvailable) {

    MyLOGI("Found extracted file in assets: %s", filename.c_str());
    fclose(file);
    pthread_mutex_unlock( &threadMutex);
    return true;

}
The function has an input parameter checkIfFileIsAvailable that is a flag to choose whether to check for older versions of the file in storage. By default it is set to false in the function declaration.
Then we check if the file is available in the assets directory and open it.
// let us look for the file in assets
bool result = false;

// AAsset objects are not thread safe and need to be protected with mutex
pthread_mutex_lock( &threadMutex);

// Open file
AAsset* asset = AAssetManager_open(apkAssetManager, assetName.c_str(), AASSET_MODE_STREAMING);
The flag AASSET_MODE_STREAMING indicates to the AssetManager that we will stream the file. We read the file in chunks of size BUFSIZ bytes and write to an output file in internal storage.
char buf[BUFSIZ];
int nb_read = 0;
if (asset != NULL)
{
    FILE* out = fopen(filename.c_str(), "w");
    while ((nb_read = AAsset_read(asset, buf, BUFSIZ)) > 0)
    {
        fwrite(buf, nb_read, 1, out);
    }
    fclose(out);
    AAsset_close(asset);
    result = true;

    MyLOGI("Asset extracted: %s", filename.c_str());
}
else
{
    MyLOGE("Asset not found: %s", assetName.c_str());
}
This function is used to load the GLSL ES shaders from assets in the function ReadShaderCode in myShader.cpp. For the sake of convenience, we define a global pointer to an object of type MyJNIHelper and instantiate it in CreateObjectNative as shown above. This global pointer is declared as a extern in myJNIHelper.h and is used in myShader.cpp to read the shaders.
Summary of the code
Similar to the first post, the GLES context is created in Java in
MyGLSurfaceView and the renderer is defined in MyGLRenderer. TriangleActivity is the only activity in the app. In a JNI call of TriangleActivity, we instantiate a native object of type Triangle and assign it to a global pointer that can be accessed by JNI calls from MyGLRenderer. The JNI call from TriangleActivity also creates an instance of MyJNIHelper and assigns it to a global pointer. This pointer to the helper class is used to call methods to read shaders from assets. Once the GLES surface is created, we create VBOs for triangle vertices and colors, and generate the shader program to render the triangle. The rendering call animates the triangle by moving its bottom two vertices.
Note 1: We use the term 'animation' to refer to moving the triangle's vertices, but this is not the standard approach in GLES to animate an object. Animation in GLES usually refers to more sophisticated approaches that involve manipulating matrices that simulate camera movement, moving the skeleton of an 3D model, etc.
Note 2: If you are familiar with GL on the desktop, then you notice that we do not setup a vertex array object (VAO) in the code. This is not required in GLES and is also not supported in GLES 2.0.