[Download code for the project: GitHub]
In this post we will see how to load and render a 3D model using the Open Asset Import Library (aka Assimp). We will
- Focus on loading a OBJ model, probably the simplest format for 3D models.
- Briefly cover texturing in OpenGLES.
The output of the project on a Nexus 5 is shown below. The 3D model is Granite head of Amenemhat III by The British Museum and is available here. We have reduced the model’s polygon count to reduce size of the .OBJ file.
In previous tutorials, we have seen how to create a GLES context in Java, load shaders in native C++ code, and move a 3D models with touch gestures. This project is very similar to the previous project that demonstrated how to convert touch gestures to a MVP matrix to manipulate a 3D object’s (colored cube’s) position in the scene. The only change in this project is that we use Assimp to load a 3D model described in the OBJ format.
As mentioned before, our approach is largely based on native C++ code in Android and there are a few pre-requisites to understand the project. Kindly go through previous tutorials to have a better understanding of this post.
Get the code
This project is available on GitHub. You can find more instructions to compile the project here.
The project requires devices with ABI armeabi-v7a. If your device supports a different ABI, then please get in touch with me for the required libraries.
Code overview
We focus on files that are new in this project when compared to the previous tutorial (all paths are relative to <project_path>/app/src/main):
- java/com.anandmuralidhar.assimpandroid/AssimpActivity.java: It contains the only activity of the project and is same as CubeActivity.java except for the change in name. It’s JNI calls are implemented in assimpActivity.cpp.
- externals/assimp-3.0: This contains the headers for Assimp 3.0. It also contains prebuilt shared library for Android ABI armeabi-v7a. If your device is of a different ABI type, then please contact me for the prebuilt shared library.
- nativeCode/common/assimpLoader.cpp: It has implementation of the
AssimpLoaderclass that contains methods to read a 3D model using Assimp’s C++ API. - nativeCode/modelAssimp/modelAssimp.cpp: It contains the
ModelAssimpclass which calls methods ofAssimpLoaderto load and render a 3D model. - assets/shaders/modelTextured.vsh and modelTextured.fsh: Shaders for rendering a textured 3D model.
- assets/amenemhat/amenemhat.obj, amenemhat.obj, and amenemhat.jpg: The .obj and .mtl files define the model’s geometry and material properties. amenemhat.jpg contains the texture that is mapped to the model’s surface.
3D models in GLES
Let us briefly look at various aspects of loading and rendering 3D models in GLES.
Texturing in GLES
In previous projects, we viewed a 3D model in GLES as comprised of a set of triangles. In order to add color to the object, we chose a color for each vertex. Now we may want to create a 3D model that resembles real-world objects. Towards this, we want to map an image to the surface of an object. As an example, compare 3D model of a bust below with the image next to it.
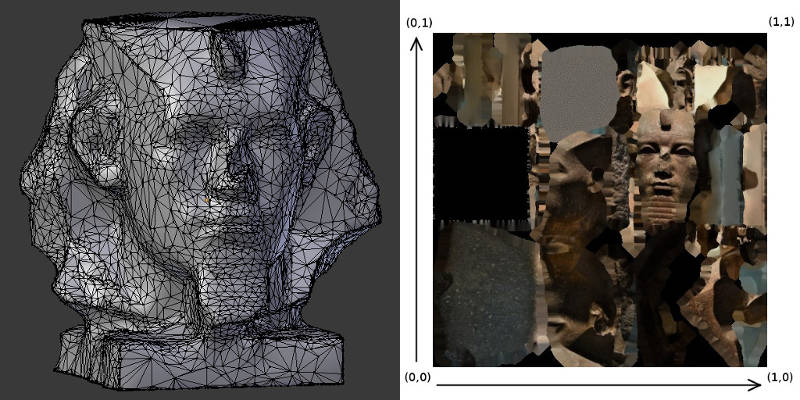
We map portions of the image to individual triangles in the 3D model to create the model as shown in the above video. This process is called texturing and is a vast subject in 3D modeling. We will restrict our attention to basics of texturing.
A triangle from the 3D model gets mapped to a triangular portion of the image as shown in the zoomed figure below.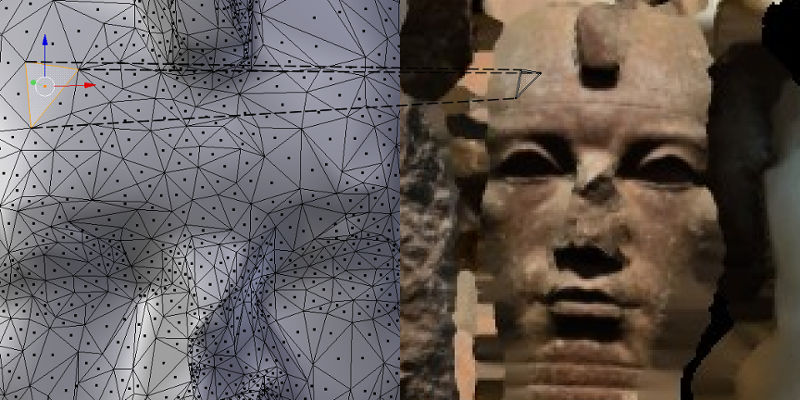 In order to specify this mapping, each vertex of a triangle in the 3D model is mapped to a vertex of the corresponding triangle in the image. Since the image is a 2D array, the coordinates of the triangle on the image are specified as a 2-tuple (u, v) with both u and v ranging from 0 to 1 as shown here. This (u,v) tuple is referred to as texture coordinates or UV coordinates of a vertex. Note that the shape of the triangle in the 3D model can be different from the shape in the image. The triangle from the image is appropriately “stretched” before being applied to the surface of the model. This mapping from vertices of a 3D model to points on a image is referred to as texture mapping. A pixel from the texture image that is mapped to the surface of the 3D model is called a “texel”.
There are many topics in textures that deserve a detailed look at a later stage. Some of these include filtering, mipmaps, and rendering to textures.
Note 1: Our discussion seems to indicate that textures in GLES are equivalent to images. This is not true. Textures can represent any data that is stored in an array. In fact it is possible to render directly to a texture if we want to store results of GPU’s computations in an output array.
Note 2: 3D models are not always created by manually mapping triangles in the model to triangles in the texture image. There are various sophisticated softwares that can take pictures of a real-world object and automatically generate a 3D model along with the image and the texture mapping. The model used in this project was constructed like that from scans or pictures of an existing object.
OBJ format
The OBJ format is a very simple format that only supports 3D geometry of the model, i.e., we cannot specify animation using this format. It contains the vertex positions, texture coordinates, vertex normals, and faces of an object. OBJ simplifies representing an object by storing the vertices separately and storing a list of tuples corresponding to vertex indices that make a face (triangle or other polygon) of the 3D model. This removes inefficiencies we saw in the previous project with replicating vertices for the colored cube. The OBJ format contains vertices of the 3D model arranged into collections referred to as meshes in 3D modeling.
An OBJ file has a companion .MTL file that contains information on the material properties of various meshes in the model. In this project we only consider OBJ’s that have a texture assigned to every mesh. We ignore other material properties like ambient color, specular color, etc.
Loading 3D models with Assimp
Open Asset Import Library or Assimp is an excellent library to import various formats of 3D models. It has a simple one-line command to load the model into its internal data structure. We can parse Assimp’s internal data structure and collect the model’s vertices, texture coordinates, faces into arrays that can be loaded to GLES. The internal data structure of Assimp remains unchanged irrespective of the format of the 3D model that we choose. So even though we have chosen a OBJ file in this project, following discussion on assimpLoader.cpp is equally applicable to any other format.
Note: Assimp has a AndroidJNI module that helps to load objects in native code in Android using asset-management if you are using the NativeActivity class. We have seen earlier that using NativeActivity is not a good idea and we avoid using this module in Assimp to load models. Since we have written native functions to read Android’s assets, this module is not of much use to us.
Use Assimp’s API to load and render a OBJ
We will look at the file assimpLoader.cpp that implements methods of the
AssimpLoader class. Though this file is long, individual functions are fairly simple. In fact we already know most of it except steps concerning Assimp’s API and texture mappings. We will only look at those steps that are not familiar to us from previous tutorials.
In the class’s constructor, we create an instance of Assimp::Importer and assign it to a pointer. Assimp::Importer is Assimp’s C++ API for reading 3D formats. In the constructor of AssimpLoader, we also perform initialization related to GLES shaders that are familiar to us by now. We find locations of vertexUVAttribute and textureSamplerLocation in the constructor and will look at the significance of these variables soon.
Next look at the function Load3DModel that is responsible for loading a 3D model into GLES’ memory. It has a one-line call to load the model into Assimp’s data structures!
scene = importerPtr->ReadFile(modelFilename, aiProcessPreset_TargetRealtime_Quality);
scene is a pointer to an object of type aiScene, which is the main structure used in Assimp for the imported data. scene will persist as long as importerPtr persist’s in the app’s memory and it is owned and managed internally by Assimp.
After importing the model with Assimp, we call two functions; LoadTexturesToGL and GenerateGLBuffers. As their names suggest, LoadTexturesToGL will parse the model’s materials to check for textures and load those textures into GLES’ memory. GenerateGLBuffers generates buffers to hold vertex positions, vertex texture coordinates, and face indices.
In LoadTexturesToGL, we begin with clearing a std::map object, textureNameMap, that holds the texture filename and texture name in GLES. Texture names in GLES are actually integers that index various textures loaded into GLES’ memory. Sometimes, they are also referred to as texture indices.
Then we parse the imported scene to check for list of textures. We store the texture’s filename in textureNameMap and initialize texture name in GLES to 0.
for (unsigned int m = 0; m < scene->mNumMaterials; ++m) {

    int textureIndex = 0;
    aiString textureFilename;
    aiReturn isTexturePresent = scene->mMaterials[m]->GetTexture(aiTextureType_DIFFUSE,
                                                                 textureIndex,
                                                                 &textureFilename);
    while (isTexturePresent == AI_SUCCESS) {<code>
        //fill map with textures, GLES name set to 0
        textureNameMap.insert(std::pair<std::string, GLuint>(textureFilename.data, 0));

        // more textures? more than one texture could be associated with a material
        textureIndex++;
        isTexturePresent = scene->mMaterials[m]->GetTexture(aiTextureType_DIFFUSE,
                                                            textureIndex, &textureFilename);
    }
}
Assimp reads texture filenames for meshes from the .MTL file and stores it in scene, but all that complexity is hidden from us. Then we provision space for the required number of textures in GLES by generating names for them:
GLuint * textureGLNames = new GLuint[numTextures];
glGenTextures(numTextures, textureGLNames);
This effectively fills up textureGLNames with an array of integers corresponding to the texture names. Since we need absolute paths of the textures to read the image, we extract the path from the .OBJ filename into modelDirectoryName:
std::string modelDirectoryName = GetDirectoryName(modelFilename);
Next we iterate over the texture names stored in textureNameMap and read a texture using OpenCV:
cv::Mat textureImage = cv::imread(textureFullPath);
This loads the texture image into a OpenCV matrix. It may seem like overkill to include OpenCV in the project for just reading an image, but I really love this library and we will use a lot of it in future tutorials.
OpenCV reads a image in the BGR format and we convert it to RGB for GLES. We also need to flip it since the image origin is at different positions for GLES and OpenCV:
// opencv reads textures in BGR format, change to RGB for GL
cv::cvtColor(textureImage, textureImage, CV_BGR2RGB);
// opencv reads image from top-left, while GL expects it from bottom-left
// vertically flip the image
cv::flip(textureImage, textureImage, 0);
To load the texture image into GLES, first bind the texture name with glBindTexture to indicate that it's a 2-dimensional texture:
glBindTexture(GL_TEXTURE_2D, textureGLNames[i]);
Then choose linear filtering:
glTexParameteri(GL_TEXTURE_2D, GL_TEXTURE_MAG_FILTER, GL_LINEAR);
glTexParameteri(GL_TEXTURE_2D, GL_TEXTURE_MIN_FILTER, GL_LINEAR);
We did not discuss various filtering options in GLES, but it suffices to know that linear filtering is generally preferred for texture images. It smoothens the rendered 3D model image by averaging neighboring pixel colors while choosing a color for the displayed pixel.
Finally we load the OpenCV matrix into GLES with glTexImage2D by specifying its dimensions and format:
glTexImage2D(GL_TEXTURE_2D, 0, GL_RGB, textureImage.cols,
             textureImage.rows, 0, GL_RGB, GL_UNSIGNED_BYTE,
             textureImage.data);
Next let's look at GenerateGLBuffers. In this function, we populate a struct MeshInfo that saves all the information required to render a mesh:
struct MeshInfo {
    GLuint  textureIndex;
    int     numberOfFaces;
    GLuint  faceBuffer;
    GLuint  vertexBuffer;
    GLuint  textureCoordBuffer;
};
We have already generated textureIndex for each texture in LoadTexturesToGL. From previous tutorials, we know how to generate and load buffers like faceBuffer, vertexBuffer, textureCoordBuffer. We use glGenBuffers, glBindBuffer, and glBufferData to generate, bind and load data into the buffer respectively. We only need to see how to extract the relevant data from Assimp.
First we read a mesh into a local variable:
const aiMesh *mesh = scene->mMeshes[n]; // read the n-th mesh
Indices for all faces are not available as a single array and need to be parsed and added to faceArray before loading them into GLES
for (unsigned int t = 0; t < mesh->mNumFaces; ++t) {

    // read a face from assimp's mesh and copy it into faceArray
    const aiFace *face = &mesh->mFaces[t];
    memcpy(&faceArray[faceIndex], face->mIndices, 3 * sizeof(unsigned int));
    faceIndex += 3;

}
Face indices have to be treated a little differently than the buffers that we have seen earlier.
glGenBuffers(1, &buffer);
glBindBuffer(GL_ELEMENT_ARRAY_BUFFER, buffer);
glBufferData(GL_ELEMENT_ARRAY_BUFFER,
             sizeof(unsigned int) * mesh->mNumFaces * 3, faceArray,
             GL_STATIC_DRAW);
We indicate the buffer's type as GL_ELEMENT_ARRAY_BUFFER since these are indices to the list of vertex positions. For example, if a particular face's indices are (23, 42, 546) then this face is created by vertices at indices 23, 42, and 546 in the list of vertex positions.
Vertex positions are available in mesh->mVertices and it is fairly straightforward to load them into GLES.
For vertex texture coordinates, we load the UV coordinates of all vertices to textureCoords.
float * textureCoords = new float[2 * mesh->mNumVertices];
for (unsigned int k = 0; k < mesh->mNumVertices; ++k) {
    textureCoords[k * 2] = mesh->mTextureCoords[0][k].x;
    textureCoords[k * 2 + 1] = mesh->mTextureCoords[0][k].y;
}
Then it is straightforward to generate a buffer for texture coordinates and load it into GLES.
We save the texture name in GLES for this mesh. Remember that texture names in GLES were saved in textureNameMap in LoadTexturesToGL. The same texture can be used by multiple meshes and the same texture name is populated in the MeshInfo struct for all those meshes.
aiMaterial *mtl = scene->mMaterials[mesh->mMaterialIndex];
aiString texturePath;	//contains filename of texture
if (AI_SUCCESS == mtl->GetTexture(aiTextureType_DIFFUSE, 0, &texturePath)) {
    unsigned int textureId = textureNameMap[texturePath.data];
    newMeshInfo.textureIndex = textureId;
} else {
    newMeshInfo.textureIndex = 0;
}
Finally let's look at the shaders and Render3DModel together to understand how to render the 3D model. The vertex shader modelTextured.vsh is as follows:
attribute   vec3 vertexPosition;
attribute   vec2 vertexUV;
varying     vec2 textureCoords;
uniform     mat4 mvpMat;

void main()
{
    gl_Position     = mvpMat * vec4(vertexPosition, 1.0);
    textureCoords   = vertexUV;
}
The only difference between this shader and cubeMVP.vsh is that instead of passing the vertex color, we pass the vertex texture coordinates in vertexUV to the fragment shader. The fragment shader modelTextured.fsh is equally simple but more interesting:
precision mediump float; // required in GLSL ES 1.00

varying vec2      textureCoords;
uniform sampler2D textureSampler;

void main()
{
    gl_FragColor.xyz = texture2D( textureSampler, textureCoords ).xyz;
}
We introduced a new variable type sampler2D and a new function texture2D. The sampler2D variable tells the shader which texture to use for sampling. We set the value of textureSampler from Render3DModel:
glActiveTexture(GL_TEXTURE0);
glUniform1i(textureSamplerLocation, 0);
So we activate texture unit 0 with the function glActiveTexture and pass this information to the shader. In order to attach a texture to texture unit 0, we need to bind the texture in Render3DModel:
if (modelMeshes[n].textureIndex) {
    glBindTexture( GL_TEXTURE_2D, modelMeshes[n].textureIndex);
}
glBindTexture will bind the texture to the currently active texture unit. Now the fragment shader can sample from this texture by using the texture coordinates as indices. This is accomplished using the texture2D function. Note that since textureCoords is passed from the vertex shader, it is interpolated across vertices and the texture is sampled at all fragments inside every triangle of the 3D model.
Rest of Render3DModel is similar to the rendering functions that we have seen previously, except for the command used to bind faces:
glBindBuffer(GL_ELEMENT_ARRAY_BUFFER, modelMeshes[n].faceBuffer);
Since faces are loaded to an index buffer, this needs to be indicated to GLES so that the indices in the faces array can be used to read the corresponding vertex positions that form each triangle of the model.
Extract files of 3D model
Let us look at the file modelAssimp.cpp that implementes the
ModelAssimp class. This class is derived from MyCube class in the previous post. In fact it is much simpler than MyCube since all the complexity towards handling 3D models is in the AssimpLoader class. In PerformGLInits, we create an instance of AssimpLoader
modelObject = new AssimpLoader();
Then we extract the OBJ file, MTL file and the JPEG from Android's assets folder so that AssimpLoader can import them into Assimp's data structure:
std::string objFilename, mtlFilename, texFilename;
bool isFilesPresent  =
        gHelperObject->ExtractAssetReturnFilename("amenemhat/amenemhat.obj", objFilename) &&
        gHelperObject->ExtractAssetReturnFilename("amenemhat/amenemhat.mtl", mtlFilename) &&
        gHelperObject->ExtractAssetReturnFilename("amenemhat/amenemhat.jpg", texFilename);
We use gHelperObject->ExtractAssetReturnFilename to extract files like shaders in Android's assets folder and we had discussed it in a previous post.
Now the extracted OBJ file can be passed to modelObject:
modelObject->Load3DModel(objFilename);
We do not need to explicitly pass names of the MTL and JPEG files to modelObject since Assimp reads the OBJ file and extracts names of the MTL file from it. The JPEG filename is then extracted from the MTL file.
ModelAssimp::Render is fairly simple since it gets the current MVP matrix and passes it to the Render3DModel method of modelObject.
Linking against prebuilt libraries
In this project, we are linking against two prebuilt shared libraries; Assimp and OpenCV. We have modified <project_path>/app/build.gradle to include these prebuilt libraries while linking the code.
model {

    repositories {
        libs(PrebuiltLibraries) {

            // Assimp prebuilt shared lib
            my_assimp {
                // Inform Android Studio where header file dir for this lib
                headers.srcDir "src/main/externals/assimp-3.0/include"
                // Inform Android Studio where lib is -- each ABI should have a lib file
                binaries.withType(SharedLibraryBinary) {
                    sharedLibraryFile = file("src/main/externals/assimp-3.0/libs/" +
                            "${targetPlatform.getName()}/libassimp.so")
                }
            }

            // OpenCV prebuilt shared lib
            my_cv {
                // Inform Android Studio where header file dir for this lib
                headers.srcDir "src/main/externals/opencv-3.0.0/include"
                // Inform Android Studio where lib is -- each ABI should have a lib file
                binaries.withType(SharedLibraryBinary) {
                    sharedLibraryFile = file("src/main/externals/opencv-3.0.0/libs/" +
                            "${targetPlatform.getName()}/libopencv_java3.so")
                }
            }

        }
    }
    ...
}
We need to also specify the paths to the libraries in jniLibs:
jniLibs{
    source {
        srcDir "src/main/externals/assimp-3.0/lib"
        srcDir "src/main/externals/opencv-3.0.0/libs"
    }
}
We have copied OpenCV's shared library and its headers from the OpenCV Android SDK while Assimp's shared library was compiled by us for the ABI armeabi-v7a. We have included the script that we used for compiling Assimp; <project_path>/app/src/main/externals/assimp-3.0/buildForAndroid.sh. This project will not execute on devices that require a different ABI. Please contact me if you need libraries for other ABIs.